Earthship 2018 Update
 Just when you thought nothing happened this year?
Temperature Tracking (2017/2018)
So last year we started tracking various temperatures inside and outside the earthship, and here are the results so far:Some Notes:
- See previous post for location of "Room T", "Tire Wall T", "Greenhouse T" and "Outside T"
- "Weather T" is from Environment Canada
- "Sunny Flag" is set to "Full Sun in Greenhouse" when I observed direct sunlight inside the greenhouse; for all other conditions this flag is not set (even if it was sunny but not directly inside the greenhouse)
- Earthship did not freeze over winter!!! YAY!!! Even without supplemental heating. I think this is quite an achievement given our great Canadian winters.
- The tire wall temperature reached a minimum of 3 degC over the 2017/2018 winter season, even with outside temperatures reaching -30 degC
- The tire wall temperature reached a maximum of 18 degC over the 2018 summer season, even with outside temperatures reaching 30 degC
- The greenhouse temperature tracks either the outside temperature or the tire wall temperature, whichever is higher
- Room temperature, i.e. the air temperature inside the "U", is about the average between the greenhouse and tire wall temperatures
- Not sure yet how temperature performance is affected by opening the greenhouse windows, though there was an appreciable affect on humidity (not shown on graph). More data is required.
Roof Slab Pour (Sep 2018)
So the final layer of the roof is a 3.5" concrete slab that protects the EPDM waterproofing layer and acts as a surface for collecting rainwater.
We built the form out of leftover hemlock from the greenhouse framing. There is 1/2" rebar along the perimeter of the form, and 4" remesh throughout. The small white blocks in the picture are pieces of leftover foam insulation used as spacers to keep the remesh embedded in the concrete during the pour.

The crew is ready to pour. BIG THANKS to Dave B, Adam and Dave W. for helping us.

We decided to hire a concrete truck and pumper to make our lives easier. Here they are priming the lines.


Then we "screeded" the concrete level with the forms using a long 2x4.

We weren't going for a smooth finish, so in most places we just left the screeding as-is. In some areas the screeding was particularly rough so there's Dave B. in the background doing some "spot" smoothing with a trowel.

And there you have it: one large concrete pad on the roof!


We left the hemlock forms in place to serve as expansion joints.

And we left our hand prints just for fun!
Interior Footings Pour (Sep 2018)
Since we were getting the concrete truck and pumper anyway, we had the capacity to pour the interior footings as well. We had to start by burying some more chases and drain pipes.
This is a blackwater drain from the utility room. The idea is to have an automated poo-bucket washing station there; something like a hacked dishwashing machine.

This is the overflow from the greywater planter to the main drain.

We added a chase to bring treated water from the greywater planter to the utility room for washing poo buckets. We are now ready to build the forms for the footings.


These footings are for interior (potentially load-bearing) walls. We are now ready to pour.

There was some concrete left over from the pour so we used some of it to "pack out" the tire walls, which means filling in the curved spaces between tires to make a flat wall. I don't have pictures of that unfortunately, but BIG THANKS to Mike C. for helping with that process.
Vent-tubes Upgrade (Oct 2018)
So last year when I was living in the earthship, I noticed that during heavy rains water would enter through the vent tubes. I realised that the runoff was saturating the ground where the vent tubes are buried. To solve this problem, we decided to waterproof the underground vent-tube connections. This was fixing an unanticipated problem so it wasn't really advancing our build, but it had to be done.
We started by digging out the snorkel, which consisted of two 50 gallon drums welded together. The entrance to the vent tube is now exposed, and this was where water entered during heavy rains.

We then connected a galvanized steel, 90 degree coupler with a neoprene gasket for a water tight seal.

For added waterproofing we wrapped the connection with Blueskin (TM), which is a sticky asphalt membrane that you can apply like tape.
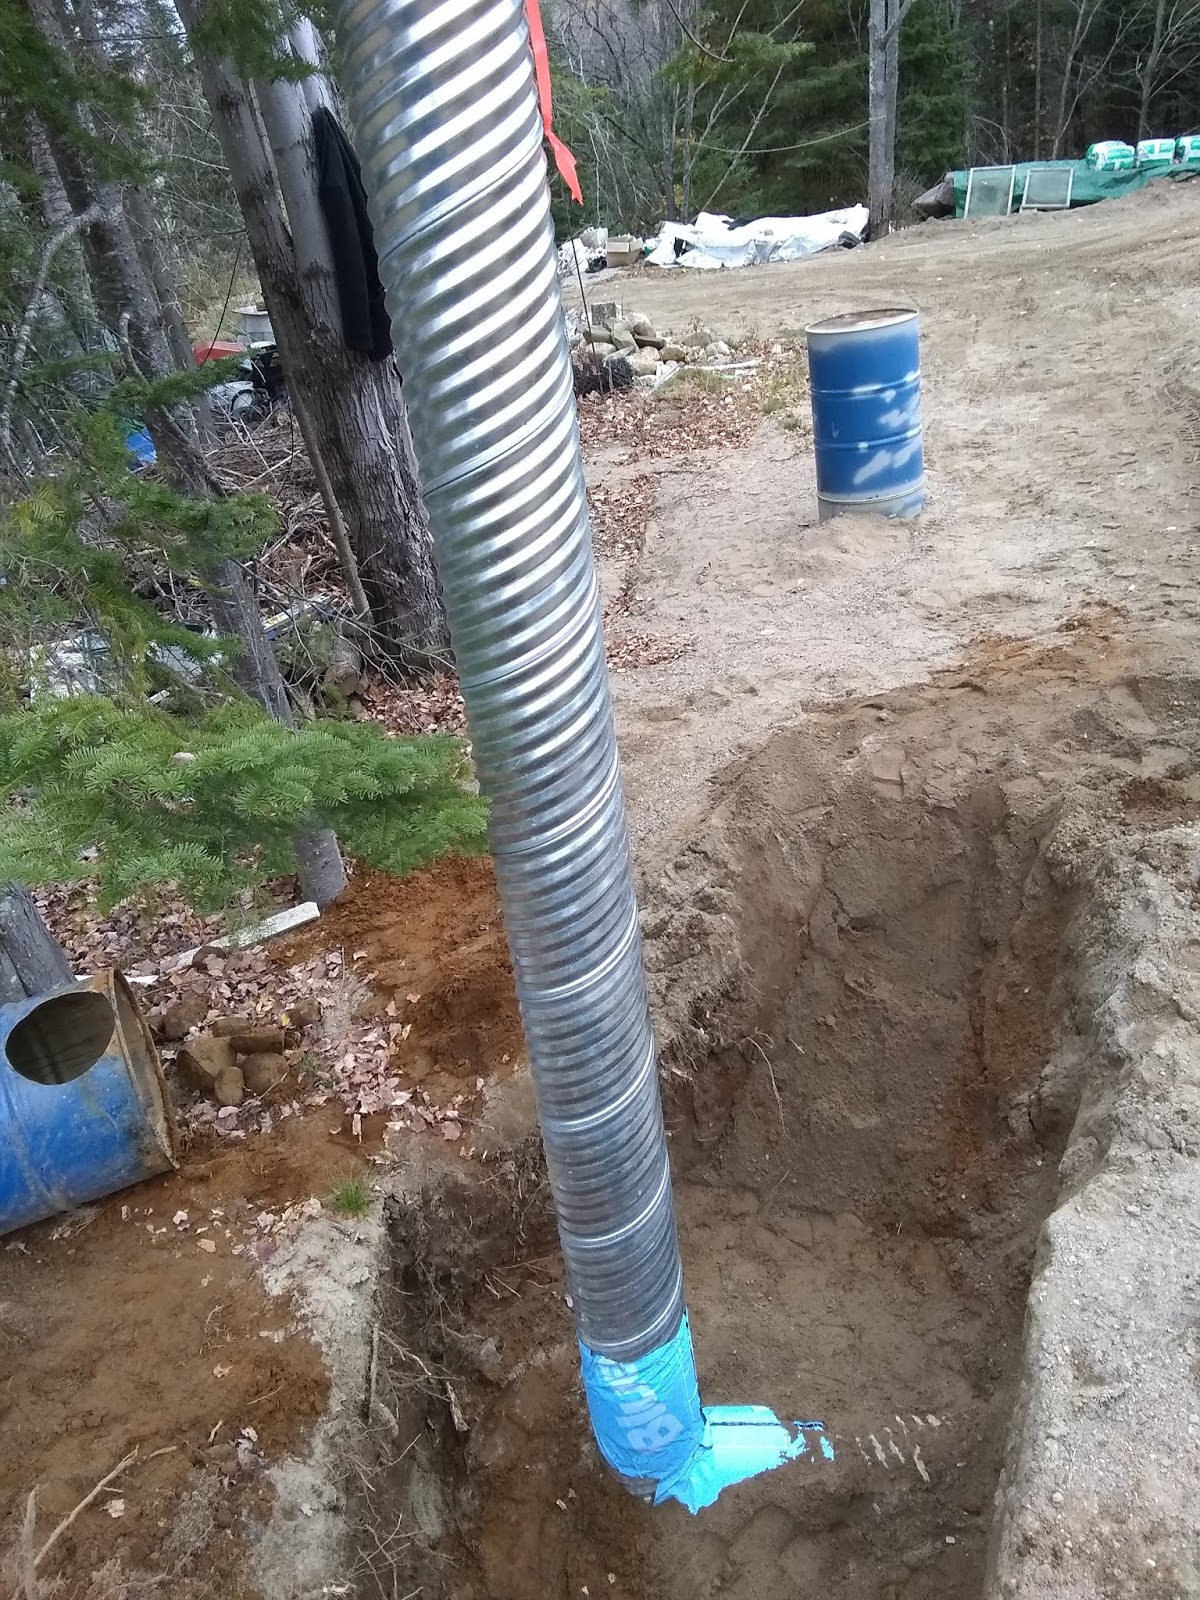
Then we connected a 10' length of galvanized steel culvert in the same manner, again for water tightness.

A bit of back-filling and voila, a new, waterproof snorkel for the fresh air vent tubes. We will probably cut the tubes down to size after the final burial. We plan on using the original drum snorkels as rain caps for the new tubes, but for now a couple of 5 gallon pales will do.
Retaining Walls and Cement Plaster (Oct 2018)


Cement plastering consists of covering the exposed 6 mil plastic with expanded metal lath and then applying layers of cement plaster. The first layer of cement plaster is "scratched" to create good mechanical bonding with subsequent layers.

Here the front stem wall has been covered with expanded metal lath and the first layer of cement plaster, called the "scratch" coat. The 6 mil plastic is now protected from UV damage.The final, smooth layer of cement plaster will be applied next year.
Starting the Final Burial (Oct 2018)


We also added manhole extensions to the cisterns so that we can still access the cisterns (for clean-out, etc.) after the final burial.

We had the dirt dumped right next to the earthship.

It wasn't as straight forward as expected. There isn't much room around the earthship to maneuvre the tractor, so we had to build ramps.

Once we piled the dirt to the right height (just below the concrete pad) and the right angle (between 30 and 45 degrees) we pulled the EPDM out to cover the berm.

Next year we will cover the EPDM with more dirt, probably a foot or two of it, which will protect the EPDM from UV damage. We can then plant herbs and berry bushes (with shallow roots) on that final layer of dirt.
See You Next Year! (Nov 2018)

Unfortunately we did not get the chance to bury the back or the other side of the earthship before snowfall, so that's where we'll begin first thing next year. Have a great winter and See you then!